The Ultimate Guide to File Type in camera
Choosing the right camera file type is one of those settings that quietly affects almost everything that happens after you press the shutter. It determines how much editing freedom you have, how quickly your camera writes to the card, how many images fit on it, and how easily you can share the results.
The short version is simple: shoot JPEG when speed and convenience matter, shoot RAW when image quality and editing flexibility matter, and use RAW+JPEG when you need both. The useful version is a little more nuanced.
Here is how to choose the best file format for your camera, without turning a straightforward menu option into a technical headache.
What does file type mean in a camera?
A camera file type is the format used to save each photograph to your memory card. The most common still-image options are JPEG, RAW, and increasingly HEIF or HEIC. Some cameras also offer a RAW+JPEG setting that saves two versions of every shot.
Each format handles image data differently. A JPEG is processed inside the camera and compressed into a ready-to-use image. A RAW file keeps far more of the data captured by the sensor, leaving many decisions—such as white balance, sharpening, noise reduction, and colour treatment—for later editing.
Think of JPEG as a meal plated by the camera. RAW is the ingredients in the kitchen, with a lot more room to adjust the recipe.
JPEG: the practical everyday choice
JPEG is still the most widely used photo format, and for good reason. It is supported almost everywhere: phones, websites, social platforms, messaging apps, photo labs, and basic editing software all handle JPEG files easily.
When you shoot JPEG, your camera applies its own processing based on the settings you choose. That may include your selected Picture Style, Film Simulation, Creative Look, white balance, contrast, saturation, sharpening, and noise reduction.
Why shoot JPEG?
- Small file sizes: You can fit far more images on a memory card.
- Fast workflow: Images are ready to share straight from the camera.
- Better burst performance: Smaller files can help the camera clear its buffer faster.
- Easy compatibility: JPEG works virtually everywhere without conversion.
- Great for good light: If exposure and white balance are right, JPEG can look excellent.
JPEG is particularly useful for family events, travel snapshots, school sports, press-style delivery, behind-the-scenes photos, and any job where speed matters more than extensive editing.
For example, if you are photographing a birthday party and want to send images to relatives that evening, JPEG is a sensible choice. You can set a pleasing colour profile in camera, expose carefully, and avoid spending hours at a computer.
The limits of JPEG
JPEG files are compressed and processed. That makes them efficient, but less forgiving. If you underexpose a JPEG by several stops and try to brighten it later, you may see ugly noise, colour shifts, and blocked shadows. Strong white balance corrections can also look rougher than they would with a RAW file.
JPEG is also usually an 8-bit format. That is more than enough for many uses, but large tonal adjustments—especially in skies, studio backdrops, or smooth gradients—can reveal banding or posterisation.
RAW: the best choice for editing control
RAW files contain much more image information than JPEGs. They are not truly “unfinished photos,” but they do require processing before they are ideal for printing, sharing, or posting online.
Every major camera brand has its own RAW format. Canon commonly uses CR2 or CR3, Nikon uses NEF, Sony uses ARW, Fujifilm uses RAF, Olympus/OM System uses ORF, and Panasonic often uses RW2. These files all serve the same broad purpose, even though the details vary by manufacturer.
Many cameras also offer compressed RAW options. These can save space while retaining most of the practical benefits of RAW. Check your specific camera manual before choosing a compressed setting, especially if you photograph scenes with extreme shadow detail or need the maximum possible latitude.
Why shoot RAW?
- More shadow and highlight recovery: Helpful when a bright sky and dark foreground appear in the same scene.
- Flexible white balance: You can correct a too-warm indoor shot later with much less image damage.
- Better colour adjustments: Useful for product work, landscapes, portraits, and mixed lighting.
- More detail for printing: Especially valuable when preparing larger prints or carefully cropped images.
- Non-destructive editing: Programs such as Lightroom, Capture One, DxO PhotoLab, and many brand-specific apps keep your original RAW file intact.
A landscape photographer shooting at sunrise is a classic RAW user. The camera may struggle to hold detail in both the bright clouds and the dark rocks. With RAW, it is often possible to lower highlights and lift shadows while keeping the scene natural.
RAW is also wise for weddings, portraits, commercial shoots, wildlife, and once-in-a-lifetime travel moments. If a photograph cannot be repeated, keeping more original image data is usually worth the larger file size.
The trade-offs of RAW
RAW files take up significantly more storage than JPEGs. They also require editing software and a little more time. Your camera may shoot fewer frames before its buffer fills during a fast burst, depending on the body, card speed, and RAW setting selected.
There is also no universal “RAW look.” A RAW image may initially appear flatter or less punchy than the JPEG preview on your camera screen. That does not mean it is worse; it means the creative processing has not been baked in yet.
For most photographers, the answer is not to avoid RAW because it needs editing. It is to build a simple editing routine: import, cull, correct exposure and white balance, apply a consistent look, export JPEGs for sharing, and back up the originals.
RAW+JPEG: when two files make sense
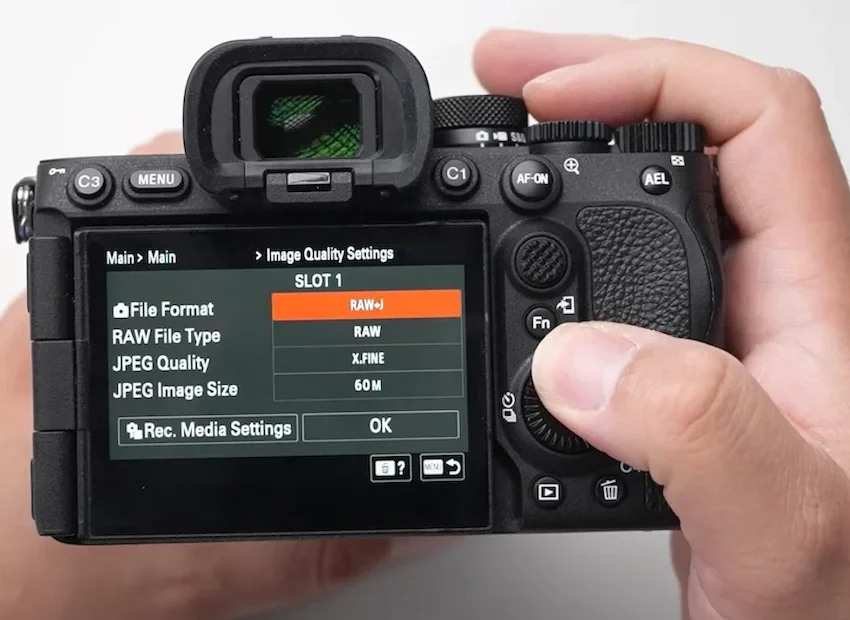
RAW+JPEG saves both formats every time you take a photo. You get an immediately usable JPEG alongside a flexible RAW original.
This setting is especially useful when you are learning, working on an important trip, or testing a camera’s colour modes. It lets you compare the camera’s processing with your own edit later.
When RAW+JPEG is worth using
- You need quick JPEG delivery but want a RAW safety net.
- You are experimenting with Fujifilm Film Simulations, Canon Picture Styles, or Sony Creative Looks.
- You are photographing an event and may need to edit only a small selection deeply.
- You are new to RAW and want to learn by comparing files from the same frame.
- You are shooting in unpredictable light, such as a concert, wedding reception, or changing weather.
The downside is obvious: storage fills quickly, and file management gets more cluttered. A 1,000-image shoot becomes 2,000 files to store and organise. If you never use the JPEGs or never edit the RAW files, the setting may be creating work rather than solving a problem.
A practical approach is to use RAW+JPEG for important assignments and unfamiliar situations, then switch to a single format for routine shooting.
HEIF and HEIC: a newer option on some cameras
HEIF, often seen with the .HEIC extension, is a newer image format available on certain recent cameras and smartphones. It can offer better compression efficiency than JPEG and may support 10-bit colour, which is useful for smoother tonal transitions.
On compatible cameras, HEIF is often linked to HDR shooting modes or HDR display workflows. It can be a strong option if you want high-quality finished files without the size of RAW.
The catch is compatibility. HEIF support has improved, but JPEG remains safer for universal sharing. Some older computers, online services, print labs, and editing applications may require conversion before they can use HEIF files properly.
Use HEIF if your devices and workflow support it. Use JPEG if you need a file that will open almost anywhere without questions.
What about TIFF, PNG, and DNG?
You may see these formats in editing software, but they are less common as direct in-camera choices.
- TIFF: A large, high-quality format often used for master edits, archival print files, or professional handoff. Most cameras do not capture stills as TIFF.
- PNG: Excellent for graphics and transparency, but not a standard camera capture format for photographs.
- DNG: Adobe’s Digital Negative format. A few cameras can save DNG directly, while some photographers convert proprietary RAW files to DNG during import.
DNG can simplify a long-term archive because it is an openly documented format, but converting files is a personal workflow choice. Keeping the manufacturer’s original RAW files is still a sensible archival practice, particularly if you value all camera-specific metadata.
How to choose the right camera file type
Start with the job, not the idea that one format is “professional” and another is “basic.” Good photographers use the file type that suits the result they need.
- Choose JPEG when you need fast delivery, small files, and minimal editing.
- Choose RAW when light is difficult, image quality matters, or you expect to edit carefully.
- Choose RAW+JPEG when you need both immediate sharing and maximum flexibility.
- Consider HEIF when your camera and entire viewing/editing chain support it comfortably.
Also check your camera’s quality settings. “JPEG” can mean different things depending on whether you select Small, Medium, Large, Fine, Extra Fine, or similar options. If storage allows, choose the largest JPEG dimensions and highest quality setting for photos you may print or crop.
For RAW, look for options such as lossless compressed, compressed, uncompressed, full RAW, or cropped RAW. If you are unsure, start with full-size RAW or lossless compressed RAW. You can experiment later once you understand the storage and speed trade-offs on your own camera.
Memory cards, backups, and real-world workflow
File type is also a storage decision. A long day shooting RAW can fill cards quickly, especially with high-resolution cameras or long bursts. Bring enough cards, use reputable brands, and format cards in the camera after confirming your photos are safely backed up.
A simple workflow can prevent a lot of stress:
- Copy files from the card to your main drive.
- Make a second backup to another drive or cloud service.
- Do not format the card until you have checked both copies.
- Edit RAW files, then export JPEGs sized for web, social media, or print.
Keep your RAW originals even after exporting final JPEGs. Editing software improves, your taste changes, and a photo you ignored this year may become a favourite later.
Where to begin
If you are still unsure, set your camera to RAW+JPEG for one week. Photograph everyday scenes: a window-lit portrait, a sunset, a room under mixed light, and a high-contrast street scene. Compare the JPEG with a basic RAW edit.
You will quickly see where your camera’s JPEGs shine and where RAW saves the shot. The best file type is not the one with the most technical prestige—it is the one that supports how you shoot, edit, deliver, and enjoy your photographs. What setting is your camera using right now, and does it genuinely match the way you make pictures?