Shoot Like a Pro With Your Smartphone camera
A great smartphone photo rarely depends on having the newest phone or the most expensive accessories. It comes from noticing light, simplifying the frame, holding the camera steady, and taking a moment to make deliberate choices before pressing the shutter.
Modern phone cameras can produce excellent images, but they also make many decisions automatically. That is useful for quick snapshots, yet it can lead to bright skies with no detail, cluttered compositions, or overly processed colours. Learning a few smartphone photography tips helps you take more control and capture photos that look considered rather than accidental.
Start With a Clean Lens and the Right Camera Settings
The quickest improvement you can make takes only a second: clean the camera lens. Phones spend their days in pockets, bags, and on tables, so fingerprints and dust are common. Even a light smudge can cause haze, soft detail, reduced contrast, and streaks around lamps or sunlight.
Use a clean microfibre cloth if you have one. A soft, clean fabric can also work, but avoid rough materials that may leave debris behind.
Then check the basic settings in your camera app.
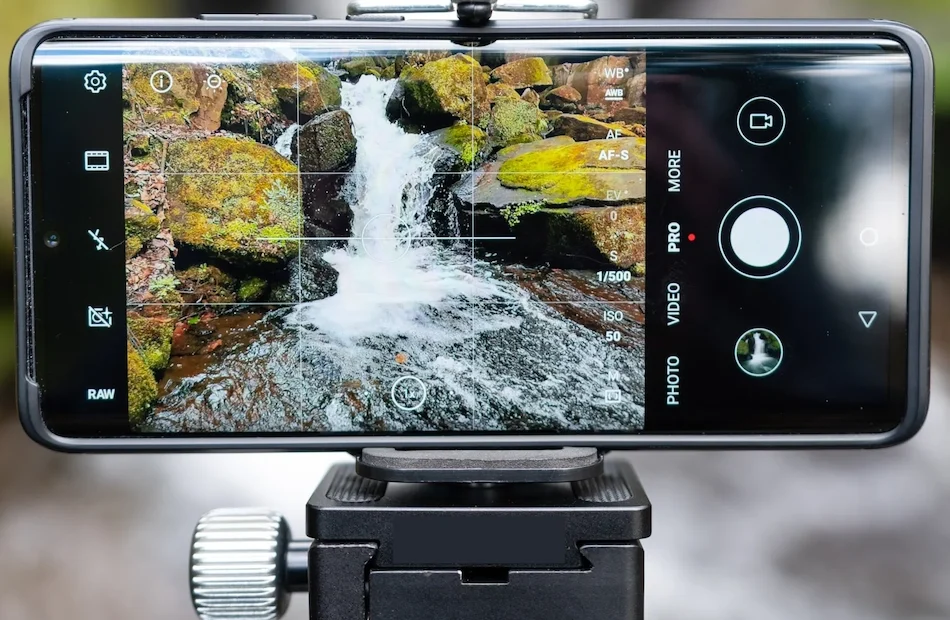
- Turn on grid lines. The grid helps keep horizons level and makes it easier to place subjects deliberately.
- Use the highest practical image quality. Some phones offer very high-resolution modes, but these may be slower or work best in bright light. For everyday shooting, the standard photo mode is often the most reliable choice.
- Choose an aspect ratio before you shoot. A taller frame suits vertical posts and stories, while a wider frame can suit landscapes. Selecting it early helps you compose rather than crop away important details later.
- Explore the available lenses. Many phones include wide, standard, and telephoto options. Each creates a different look, so do not assume one lens suits every subject.
- Reduce heavy beauty effects if you prefer natural photos. Strong smoothing and automatic scene effects can be difficult to undo later.
Every phone processes photos differently. Spend a little time testing yours in bright daylight, indoors near a window, and after dark. The goal is not to memorise every setting. It is to understand how your own camera reacts to difficult light.
Use Tap Focus and Exposure Control
Automatic camera settings are convenient, but they do not always choose the right subject or brightness. Before taking a photo, tap the main subject on the screen. This tells the phone where you want sharp focus.
Most camera apps also let you adjust exposure after tapping. Look for a sun icon, slider, or brightness control near the focus point. Lowering exposure slightly can preserve a bright sky, deepen colours, and stop highlights from looking washed out. Raising it can help reveal a subject standing in shadow.
Many phones also offer focus and exposure lock when you press and hold on the screen. This is especially helpful when you are composing a portrait or photographing a backlit subject. Lock the setting, reframe the image, and the camera is less likely to change brightness at the last moment.
A useful habit is to take two or three versions of an important scene. Try one at the automatic exposure, one slightly darker, and one slightly brighter. You will quickly learn which treatment best suits the subject.
Light Matters More Than Camera Specs
Photography depends on light. A modest phone camera in attractive light can create a far stronger image than an advanced camera in harsh, dull, or mixed lighting.
Start by looking at the direction of the light. Light coming from the side usually adds shape, texture, and depth. Light coming directly from the front can be useful for clear, even detail, but it can also make a scene look flatter.
Use window light for portraits
For an easy portrait setup, place your subject near a window and turn them slightly toward the light. Window light is often soft and flattering, particularly when direct sun is not pouring through the glass. It can create gentle shadows that give the face more dimension.
Keep an eye on the background. A bright window behind the subject may cause the face to become too dark. Move the person so the window is to one side, or tap their face and increase exposure carefully.
Work with outdoor light
Early morning and late afternoon often provide softer light, warmer tones, and longer shadows. These conditions can work beautifully for landscapes, travel images, and portraits.
Midday sun is more challenging because it can create strong shadows and very bright highlights. If you need to shoot then, look for open shade beside a building, under an awning, or near a large tree. Open shade is usually better than deep shade because it remains bright enough for a clean image.
Use flash thoughtfully
A phone flash can be useful in an emergency, but it is rarely the most flattering option for people or food. The light comes from close to the lens, which can make subjects look flat and leave backgrounds very dark.
Before using flash, try moving closer to a window, doorway, lamp, or other available light. For small objects, a white sheet of paper or a light-coloured card placed opposite the main light can reflect light into shadows.
Compose Every Frame With Intent
Composition is how you arrange subjects, backgrounds, lines, and empty space within the image. Strong composition makes a simple subject feel interesting. Poor composition can make an impressive place look ordinary.
Use the rule of thirds
The rule of thirds is a practical starting point, not a law. With your grid enabled, place important elements along the horizontal or vertical lines, or near their intersections.
For a landscape, place the horizon near the upper third when the foreground is interesting. Place it near the lower third when the sky is the main feature. For portraits, positioning the eyes near an upper grid line often creates a balanced frame.
Centred composition can also work well. Use it when photographing symmetry, reflections, doorways, architecture, or a subject that benefits from a direct and formal look.
Find leading lines
Leading lines guide the viewer through the image. Roads, railings, paths, shadows, bridges, tiled floors, and shorelines can all lead toward the main subject.
Try getting lower or moving a few steps sideways until the line begins near the bottom or edge of the frame. This gives the eye a clear route into the photograph.
Create depth with foreground and framing
Wide scenes can feel flat on a phone screen. Add depth by including something close to the camera, something in the middle distance, and something farther away. A flower, rock, table edge, fence, or person in the foreground can make a landscape feel more immersive.
Natural frames work in a similar way. Shoot through an archway, doorway, window, branches, or the gap between buildings. The frame does not need to surround the subject perfectly. Even a partial frame can direct attention and add layers.
Give the subject room to breathe
Negative space is the uncluttered area around a subject. A person against a plain wall, a bird in a large sky, or a lone walker on an empty beach can be more powerful when there is space around them.
Before shooting, check the edges of the frame. Remove distractions when possible: a bright sign, a half-visible stranger, a bin, a branch appearing to grow from someone’s head, or a sliver of empty pavement. Small adjustments often make the biggest difference.
Hold Your Phone Steady for Sharper Photos
Blurry images are often caused by camera movement, especially indoors or at night. Phone cameras may use a slower shutter speed when light is limited, so even small movements can matter.
Hold the phone with both hands and tuck your elbows toward your body. This is more stable than holding it one-handed at arm’s length. Take a breath, pause briefly, then press the shutter gently.
If your phone supports it, a physical volume button can be used as a shutter release. A timer can also help for still scenes because it avoids movement caused by touching the screen at the moment of capture.
Use your surroundings as support when you can:
- Rest your elbows on a table.
- Lean against a wall or post.
- Place the phone on a stable surface.
- Use a small tripod for night scenes, group photos, and self-portraits.
For moving subjects, use burst shooting if your phone provides it. The control varies by device, so test it before you need it. A short burst gives you several frames to choose from, which is useful for children, pets, sports, splashes, and candid moments.
Avoid Digital Zoom When Possible
One of the most useful mobile photography techniques is knowing when to move rather than zoom. Digital zoom enlarges part of the image, which can reduce detail and make noise more visible.
If you can, walk closer to the subject. If your phone has a genuine telephoto lens, switch to that lens rather than relying on extreme pinch zoom. Optical or dedicated telephoto options can preserve more detail than digital enlargement, although results still depend on light and distance.
When you cannot get closer, take a carefully composed photo at a lower zoom level and crop later if needed. This gives you more flexibility and can produce a cleaner result than pushing the zoom too far while shooting.
Change Your Angle Before You Take Another Photo
Most people photograph everything from standing eye level. It is a natural perspective, but it is also predictable. Changing your position can immediately make an image more engaging.
- Get low. A low angle can make a person, pet, building, or flower feel more dramatic.
- Go high. A higher viewpoint works well for food, markets, patterns, and crowded scenes.
- Move closer. Filling the frame can reveal texture, expression, and detail.
- Step back. More distance can show a subject in context and leave useful negative space.
- Try the side view. Turning slightly can reveal better light, cleaner backgrounds, or more depth.
Before settling on a frame, take a few steps in different directions. Often the best photograph is nearby, not directly in front of you.
How to Photograph People, Food, and Landscapes
Portraits
Good portrait photography starts with comfortable light and a simple background. Place the subject near a window or in open shade outdoors. Focus on the eyes, as they are usually the most important part of the image.
Avoid getting extremely close with a wide lens, as it can exaggerate facial features. Step back and use a modest amount of zoom, or switch to a portrait or telephoto lens if your phone has a useful one. Be aware that portrait mode can sometimes struggle around hair, glasses, hands, and detailed edges, so take both a portrait-mode shot and a standard photo when the moment matters.
Food
Food generally looks best in soft side light. A seat near a window is often better than bright overhead restaurant lighting. Turn the plate until the light reveals texture in the ingredients.
Try two dependable angles. Shoot directly from above for flat dishes, table spreads, and graphic arrangements. Use a lower angle for food with height, such as burgers, cakes, sandwiches, and stacked pancakes.
Keep the styling simple. Remove used napkins, packets, stray cutlery, and clutter unless they add to the story of the meal.
Landscapes and travel scenes
Landscape photography benefits from depth and scale. Include an interesting foreground element, such as rocks, flowers, a path, or a person. This helps the viewer understand the size of a mountain, coastline, building, or open view.
Keep the horizon level unless a deliberate tilt supports the image. If the sky is bright, tap it and lower exposure a little, then check that the land has not become too dark. In difficult scenes, taking several exposures is often smarter than relying on a single attempt.
Edit to Improve, Not to Disguise
Editing is part of the photographic process, but subtle edits usually age better than dramatic ones. Start with the tools in your phone’s photo app before adding extra editing software.
- Crop and straighten. Remove distractions and correct a crooked horizon.
- Adjust exposure. Make the image bright enough without losing important highlight detail.
- Correct warmth or white balance. Aim for believable skin tones and colours that fit the scene.
- Add contrast carefully. A small adjustment can add depth, while too much can crush shadows and erase bright detail.
- Use saturation sparingly. Over-saturated colours can look unnatural very quickly.
- Check sharpness and noise. Too much sharpening can create harsh edges, while heavy noise reduction can make detail look smeared.
Filters are not automatically bad, but use them with restraint. If a filter changes every colour, darkens every shadow, or makes skin look unnatural, reduce its strength or remove it. A good edit should support the photo rather than become the whole point of it.
Slow Down and Build Better Habits
The difference between a rushed snapshot and a polished phone photo is often only a few seconds. Before pressing the shutter, pause and check four things:
- Is the lens clean?
- Is the subject in focus?
- Is the background helping or distracting?
- Is the horizon level and the exposure right?
Then take the photo, review it briefly, and try again if the scene allows. Move closer, change height, adjust exposure, or wait for a distracting person to leave the frame. The first image is not always the best one.
To improve faster, photograph ordinary subjects regularly. Practice with a cup of coffee by a window, the view from your commute, a pet, a familiar street, or light falling across a wall. Frequent practice teaches you to notice patterns, shadows, reflections, colour combinations, and clean backgrounds without having to think so hard about them.
Review your camera roll occasionally and look for patterns. When a photo works, identify why: perhaps the light was softer, the composition was simpler, or you got closer. When an image fails, work out whether the problem was motion blur, poor light, clutter, focus, or over-editing. That small habit turns random success into repeatable skill.
Your smartphone is already a capable creative tool. Clean the lens, use the light well, simplify the frame, steady your hands, and edit with a light touch. With those habits, you can take sharper, more expressive photos wherever you are.
Learn practical smartphone photography tips for sharper, better-composed photos. From light and focus to editing and portraits, these techniques help you shoot with confidence. smartphone photography, mobile photography tips, phone camera, photo composition, photo editing, portrait photography Shoot better smartphone photos with practical tips for light, composition, focus, stability, editing, portraits, food, and landscapes.