How to Use a Monopod
A monopod gives you support without the bulk and setup time of a tripod. It can make a long telephoto lens easier to hold, help steady a camera in low light, and let you work more comfortably at events, on trails, or from crowded sidelines. Used correctly, it is more than a stick for resting a camera on: it becomes a flexible part of your shooting technique.
The key is to use the monopod as a support point while still controlling the camera with your hands and body. It will not hold the camera completely still like a tripod, but it can reduce fatigue and make your framing more consistent.
Choose and set up the right monopod
Before learning how to use a monopod, make sure it is suitable for your camera and lens combination. Check the manufacturer’s stated load capacity, particularly if you use a full-frame camera, a large telephoto lens, or a professional video setup. The mounting point should also be secure, with a plate or screw that fits your camera or lens collar properly.
Extend the monopod so the camera sits at a comfortable working height. When you hold the camera to your eye, your elbow should remain slightly bent rather than locked straight. This gives you room to move and makes it easier to absorb small movements.
For a camera with a telephoto lens, mount the monopod to the lens tripod collar if the lens has one. This usually creates a better balance than attaching it to the camera body. With a smaller lens, mounting directly to the camera is normally practical.
How to hold a monopod for steady photos
Stand with your feet about shoulder-width apart and keep your posture relaxed. Avoid leaning heavily away from the monopod. Instead, think of your body, camera, and monopod as a stable three-point support system.
- Place the foot slightly in front of you. This gives the monopod room to angle without getting in the way of your feet.
- Keep one hand on the camera. Use it to operate the shutter, zoom, focus, and other controls.
- Use your other hand to support the lens. Place it underneath the lens barrel rather than gripping the top or side.
- Press the monopod gently into the ground. Light downward pressure helps maintain contact, but do not force it hard enough to make your posture tense.
- Keep the camera close to your body. A compact position is usually easier to control than holding the camera far in front of you.
You can also angle the monopod slightly toward your body and brace it against your foot or the inside of your leg. This creates another point of control, especially when you are standing still. Avoid placing the foot where it could slide or where another person might catch it.
Use your body as part of the support
A monopod works best when it is connected to a stable stance. Keep your knees slightly relaxed, distribute your weight evenly, and avoid twisting your upper body. If you are using a long lens, turn your torso toward the subject rather than rotating only your arms.
For horizontal photographs, keep your elbows close to your sides. For vertical images, rotate the camera smoothly and check that the monopod remains directly below the camera rather than swinging out to one side. If your camera has a rotating collar or an L-bracket, it may be easier to switch orientations while maintaining balance.
Breathing technique can help with critical moments. Take a normal breath, exhale gently, and press the shutter without jabbing at it. This matters most when the shutter speed is near the slowest speed you can handhold comfortably.
Set the shutter speed for the subject
A monopod reduces camera movement, but it cannot stop a moving subject. Choose your shutter speed according to what is moving in the frame as well as how much support you have.
For a static subject, a monopod may allow you to work at a slower shutter speed than you could comfortably manage handheld. The exact limit depends on the camera, lens, focal length, your technique, and whether image stabilization is available. Make a few test frames and inspect them at full size rather than relying only on the camera’s rear screen.
For sports, wildlife, or people in motion, the subject usually determines the minimum shutter speed. A monopod can make it easier to follow the action and maintain a composition, but it does not freeze movement. Increase the shutter speed when you see subject blur, even if the camera itself appears steady.
Useful starting points might include:
- Static scenes: choose the slowest speed that produces sharp results with your technique, then check the image at high magnification.
- People moving normally: begin with a moderate shutter speed and adjust if hand or body movement is blurred.
- Fast action: use a shutter speed appropriate for the subject’s speed, accepting that you may need a wider aperture or higher ISO.
- Panning: use a shutter speed slow enough to create background movement while keeping the subject acceptably sharp.
Image stabilization and monopod technique
Image stabilization, sometimes called optical stabilization or sensor-shift stabilization, can work alongside a monopod, but the correct setting depends on the camera and lens. Some systems detect when the camera is supported; others provide dedicated modes for panning or tripod use. Read the relevant instructions for your equipment rather than assuming stabilization should always be switched off.
A monopod is not the same as a rigid tripod. The camera can still move slightly as you frame, press the shutter, or follow a subject. In many situations, stabilization remains useful. If you are using a very slow shutter speed with a relatively static setup, make test images with different stabilization settings and compare the results.
How to photograph sports and wildlife
Monopods are particularly useful with long lenses because they take some of the weight off your arms while leaving you free to pan and reframe. Position the monopod so it does not restrict your movement, then keep your upper body loose enough to follow the subject.
For a runner moving across the frame, rotate from your hips and torso rather than swinging only the camera with your arms. Keep the monopod foot in contact with the ground, but allow the shaft to move naturally as you track the subject. A completely vertical monopod can feel restrictive when panning; a slight angle often provides a smoother range of movement.
When photographing wildlife, avoid making sudden movements with the monopod, particularly when working close to a subject. Set your focus mode, exposure, and framing before the important moment whenever possible. A monopod helps you stay ready for longer, but it does not replace careful observation.
Try a monopod for panning
Panning involves moving the camera horizontally during the exposure to suggest motion. It is often used for cyclists, cars, runners, and other subjects crossing the frame.
- Choose a position that gives you a clear, safe view of the subject’s path.
- Set a shutter speed slow enough to show movement in the background.
- Follow the subject before pressing the shutter.
- Press the shutter while continuing the same smooth movement.
- Keep moving briefly after the exposure rather than stopping abruptly.
The monopod can support the camera while still allowing horizontal movement, but it may make vertical movement more noticeable. Keep the monopod foot planted and concentrate on maintaining a level, controlled swing. Expect a number of imperfect frames while you refine the timing.
Use a monopod for video
A monopod can provide useful support for video when a tripod is impractical, especially at events or in busy locations. It is well suited to static shots, short interviews, and situations where you need to move quickly between positions.
For a static shot, stand comfortably and avoid touching the monopod unnecessarily during the recording. For moving shots, use small controlled steps and keep the monopod close to your body. A monopod generally will not provide the same smooth movement as a dedicated video tripod, fluid head, or gimbal, so treat it as a lightweight support rather than a complete stabilizing system.
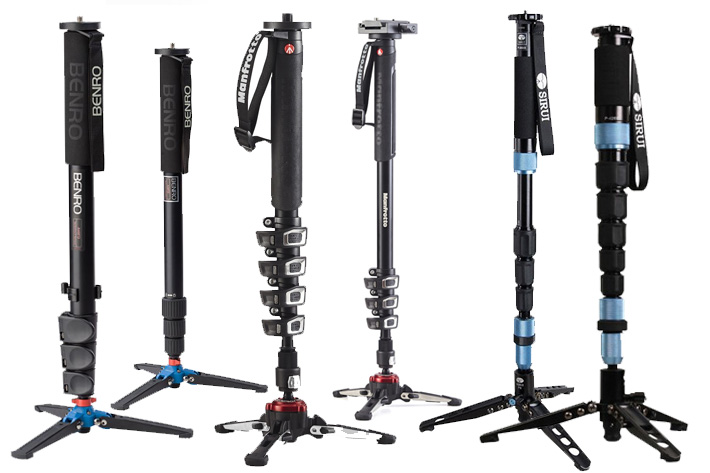
Some monopods have feet or a small base that can stand independently. Even then, do not assume the camera is safe unattended. A gust of wind, an uneven surface, or a bump from another person can tip the setup. Keep a hand on the camera whenever the support is not designed and rated for hands-free use.
Common monopod mistakes
- Extending it too far: the thinnest sections can be less rigid, and excessive height can make the setup harder to control. Use only the height you need.
- Gripping the monopod too tightly: tension travels into your arms and makes smooth framing more difficult.
- Forgetting subject movement: support can reduce camera shake, but it cannot prevent a moving person or animal from becoming blurred.
- Using an unstable surface: loose gravel, wet floors, steep slopes, and crowded walkways require extra care.
- Ignoring the mounting screw: check that the camera or lens is firmly attached before lifting the setup.
- Blocking other people: at sporting events or performances, keep the monopod close and follow venue rules.
When a tripod is the better choice
Choose a tripod when you need the camera to remain fixed for a long exposure, panoramic sequence, focus stacking, time-lapse, or carefully composed landscape photograph. A tripod also makes sense when you need to step away from the camera or maintain an exact framing for repeated shots.
Use a monopod when mobility matters more than absolute stillness: long-lens sports photography, wildlife walks, events, travel, street scenes, and locations where a tripod would be inconvenient or restricted. It occupies a useful middle ground between handheld shooting and a fully supported camera.
The most effective approach is to treat the monopod as an extension of your stance. Set it at the right height, keep the camera and lens balanced, choose a shutter speed for the subject, and stay relaxed while you shoot. With those habits in place, a monopod can make long lenses more manageable and give you sharper, more consistent photographs without slowing you down.