The Ultimate Guide to Photographing Stars, Trails, and the Milky Way
Photographing the night sky looks intimidating from the outside, but the core process is simple: get away from bright lights, keep the camera still, focus precisely, and pick an exposure that suits what you’re after. From there, the technique branches depending on whether you want pinpoint stars, sweeping star trails, or a detailed Milky Way scene.
You don’t need specialist astronomy gear to get started. A camera with manual controls, a wide lens, a steady tripod, and a bit of planning will get you further than expensive equipment used without a plan.
Essential Gear for Night Sky Photography
- Camera with manual exposure controls: You need direct control over shutter speed, aperture, ISO, and focus. Shoot in RAW so you have room to correct shadows, colour, and white balance afterward.
- Wide-angle lens: Something in the 14mm to 24mm range on a full-frame camera is a common starting point for Milky Way shots. Wider lenses capture more sky and let you use longer shutter speeds before star movement becomes obvious.
- Fast aperture: A lens that opens to f/2.8 or wider makes life easier, especially for the Milky Way. Slower lenses still work, but usually need a higher ISO or a longer exposure to compensate.
- Solid tripod: Even tiny vibrations show up in a long exposure. Set it on firm ground, avoid extending the centre column if you can, and secure any straps that might catch the wind.
- Remote release, intervalometer, or self-timer: This stops your hand from shaking the camera when the shutter fires. An intervalometer is essential if you’re shooting a long sequence for star trails.
- Headlamp with a dim red mode: Use it sparingly, keep the beam pointed down, and avoid shining it toward other photographers or into your own long exposures.
- Spare batteries and memory cards: Cold weather drains batteries faster, and long RAW sequences eat through storage. Keep spares warm in a pocket.
- Lens cloth and dew control: Condensation can form on the front element without you noticing in the dark. Check the lens periodically, and consider a lens heater band in damp or humid conditions.
Plan the Location and Conditions
No camera setting can rescue a shoot ruined by heavy light pollution, cloud cover, haze, or an overly bright moon. Planning is arguably the most important part of night sky photography, and it starts well before you leave the house.
Find Darker Skies
Light pollution washes out contrast and hides fainter stars, so it pays to get away from city centres and suburban commercial strips. Light pollution maps, widely available online, are a good way to scout dark areas before you travel. A hill, coastline, rural road, or protected landscape near you may be far darker than wherever you usually shoot.
Darkness isn’t the only thing to check. Scout the location in daylight if you can, so you know the paths, the stable ground, potential foreground subjects, parking, and any access restrictions. Don’t rely on a phone screen alone to navigate unfamiliar terrain once the sun is down.
Work With the Moon, Not Against It
For the strongest Milky Way image, the darkest part of the night usually wins. Shooting during a new moon, or when the moon is below the horizon, helps preserve faint detail in the galactic core and the dust lanes around it.
That said, moonlight isn’t always the enemy. A low or partial moon can gently light up mountains, trees, or a building in the foreground, effectively acting as a soft natural light source. The trade-off is a brighter sky with fewer visible faint stars, so decide in advance whether the landscape or the Milky Way is your priority.
Check the Sky, Not Just the Forecast
A forecast that says clear can still hide a mediocre night for photography. High cloud, humidity, smoke, and haze all reduce clarity even when it technically isn’t raining. Check hourly cloud cover if your weather app offers it, watch for moisture building on the lens, and give your eyes and camera time to adjust once you arrive.
Plan the Milky Way’s Position
Where and when the Milky Way is visible changes with the season, time of night, your latitude, and which direction you’re facing. In much of the Northern Hemisphere, the brighter galactic core tends to be easiest to photograph during the warmer months, while other times of year show different star fields and constellations instead.
A stargazing or night-photography planning app will show you when the Milky Way rises, how high it climbs, and where the moon will be at the same time. This is especially useful if you want the galactic core lined up above a specific foreground feature.
How to Photograph the Milky Way
Set up before it’s fully dark if you can. Compose your frame, level the tripod, remove any filters from the lens, and turn off image stabilization once the camera is mounted, since it can sometimes work against a tripod-mounted shot.
Focus Accurately in the Dark
Autofocus usually can’t lock onto stars. Switch to manual focus, turn on live view, and zoom in digitally on a bright star or a distant light. Turn the focus ring slowly until that point looks as small and sharp as possible.
Don’t just twist the lens to the infinity mark and call it done. On many lenses, true infinity focus sits slightly off from that marking. Once focus is set, avoid bumping the ring. A small piece of tape across the focus ring can help hold it in place.
Starting Settings for the Milky Way
Treat these as a starting point, not a formula. Take a test shot, zoom in to check it, and adjust one setting at a time from there.
- File format: RAW
- Exposure mode: Manual
- Aperture: As wide as your lens allows, ideally f/2.8 or faster
- Shutter speed: Around 10 to 20 seconds with a wide lens
- ISO: Start somewhere around ISO 1600 to 3200 and adjust based on how bright the sky looks
- White balance: Set it manually rather than using auto, since RAW files let you fine-tune colour later anyway
- Drive mode: A two-second timer, remote release, or exposure delay setting
Use the 500 Rule as a Guide, Not a Law
The 500 rule gives a rough estimate of the longest shutter speed you can use before stars start to trail. Divide 500 by the full-frame equivalent focal length of your lens. A 20mm lens, for example, suggests roughly 25 seconds.
It’s only an approximation. High-resolution sensors can reveal star trailing sooner than the rule predicts, and stars near the edges of a wide frame often stretch before the ones in the centre do. It’s safer to treat the result as a ceiling, then take a test exposure and zoom into the corners to check. If stars look like short lines instead of points, shorten the shutter speed.
If the frame gets too dark after cutting exposure time, raise ISO a little, open the aperture further if your lens allows it, or plan to take several exposures and stack them later to bring back brightness without adding noise.
How to Create Star Trails
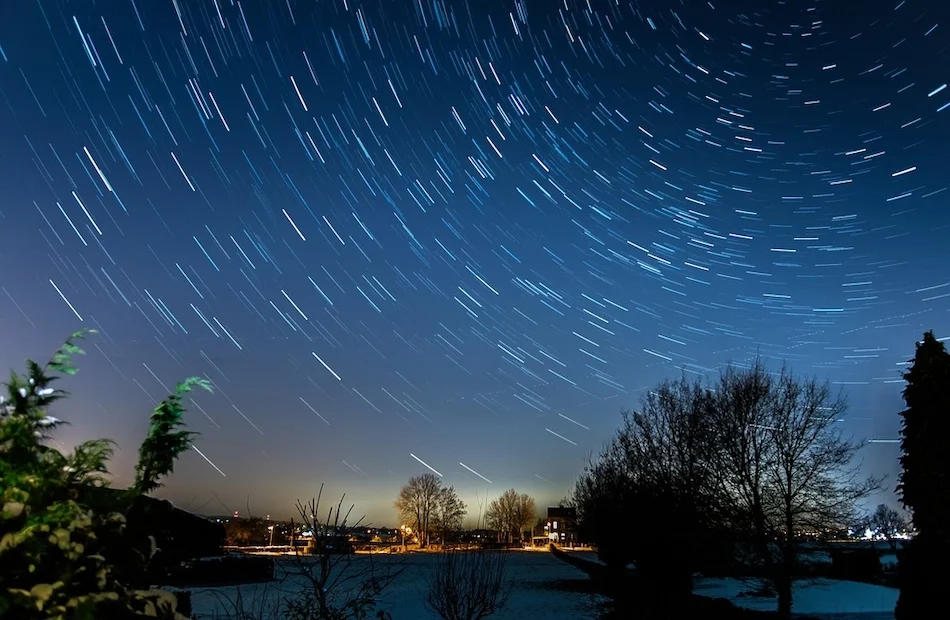
Star trails capture the Earth’s rotation as arcs across the sky. Point the camera toward a celestial pole and you get circular trails; look east or west and you get diagonal streaks instead. In the Northern Hemisphere, trails circle around Polaris, the North Star.
Shoot a Sequence, Not One Long Exposure
A single very long exposure can technically work, but a sequence of shorter frames gives you more control. If a car’s headlights sweep through, clouds roll in, or the lens fogs up, you can simply discard the affected frames instead of losing the whole shot.
Set the camera to shoot continuous exposures with the smallest practical gap between them. Twenty- to thirty-second exposures at a moderate ISO are a reasonable starting point, though the right settings depend on ambient light and how bright the sky is. Keep shooting for at least an hour for visibly long trails; the longer the sequence, the longer the arcs.
Turn off long-exposure noise reduction for this kind of sequence. On many cameras, that feature fires a second dark exposure after every shot, which creates gaps in your trail.
Stack the Images
Import the sequence into star-trail stacking software, or an editor that supports a lighten blend mode. The software combines the brightest star positions from each frame into one continuous-looking trail, giving you more control than a single marathon exposure would.
Before stacking, remove any frames ruined by headlights, camera bumps, heavy cloud, or condensation. Keep your edits consistent across the sequence so the sky doesn’t shift in colour or brightness partway through the trail.
Build a Strong Night Sky Composition
A sky full of stars is impressive on its own, but a foreground gives the image scale and a sense of place. Look for a tree, ridge, lake, road, cabin, rock formation, or shoreline that supports the sky rather than fighting with it for attention.
Compose the frame before it gets fully dark if you can, using the landscape as your guide, then fine-tune once the stars appear. Keep the horizon level unless a deliberate tilt genuinely improves the shot, and avoid placing a bright artificial light near the edge of the frame, where it can cause flare.
Foreground lighting needs a light touch. A brief, low-power sweep of warm light across a rock or tree can reveal texture, but too much turns the scene artificial and pulls attention away from the sky. Often, a plain silhouette against the stars works better than any added light.
Edit Without Losing the Natural Night
RAW processing is where a decent capture turns into a finished image. Start with the basics: overall exposure, white balance, highlight recovery, and shadow detail. From there, make modest adjustments to contrast, clarity, texture, and colour rather than pushing every slider to its limit.
Noise reduction can clean up a high-ISO file, but overdo it and stars turn into soft smudges while fine Milky Way detail disappears. Apply sharpening carefully and check the image at full size before deciding it’s finished. If you shot several identical frames of the same Milky Way composition, stacking them can improve detail and reduce noise, though it requires aligning the sky separately from the foreground.
Aim for something believable. Night skies do hold subtle colour, but an oversaturated blue sky, heavy-handed saturation, or crushed black shadows tend to look less convincing than the real scene ever did.
Night Photography Safety and Etiquette
- Tell someone where you’re going, especially if you’re heading out alone.
- Bring warm layers, water, a way to navigate, and a charged phone.
- Stay well clear of cliff edges, unstable ground, roads, and changing tides.
- Respect private land, closures, wildlife, and quiet hours in the area.
- Keep lights dim and pointed downward when other photographers are nearby.
- Leave the location exactly as you found it.
The single most useful skill in night photography is patience. Take a test shot, check the focus and star shapes, adjust one thing, and shoot again. The more nights you spend out under the stars, the better you’ll understand how your own camera handles darkness, cold, light pollution, and the particular sky above the places you shoot most.