Mastering the Exposure Triangle: Aperture, Shutter Speed, and ISO Explained
If you’ve ever shot in manual mode and ended up with a photo that’s either a blown-out mess or a muddy blur, you’ve met the exposure triangle the hard way. It’s also the reason so many photographers leave their camera dial stuck on Auto, wondering why action shots turn out blurry or sunsets look flat and washed out. The good news is that once you understand how aperture, shutter speed, and ISO work together, the guesswork disappears and you start creating images on purpose.
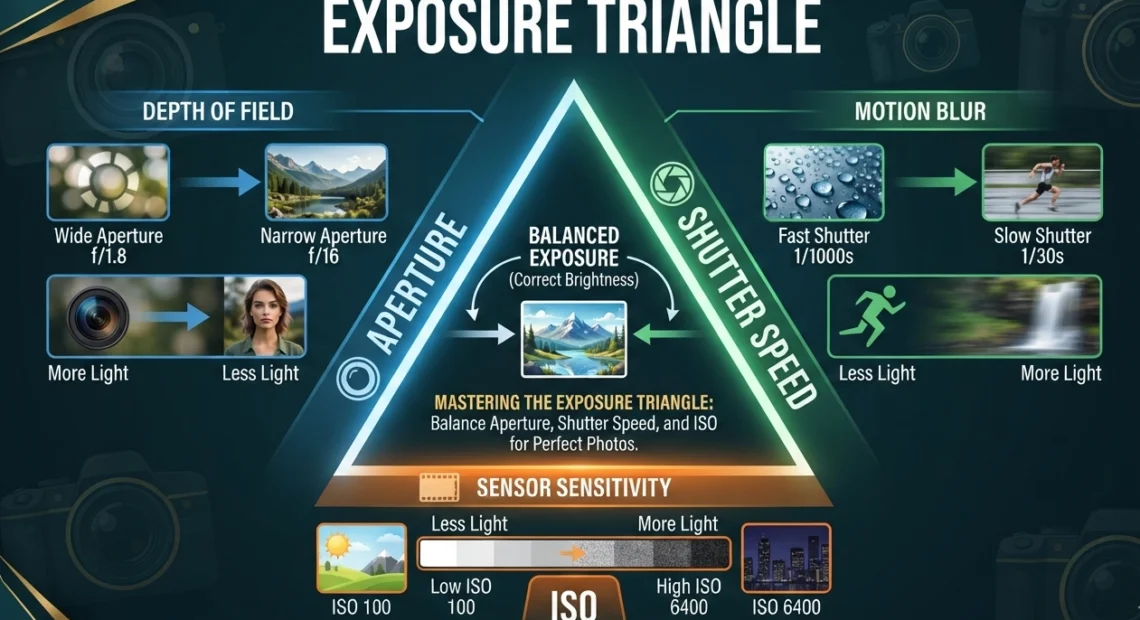
Think of it like a window with shutters. Aperture is how wide you open them. Shutter speed is how long you leave them open. ISO is how sensitive the room is to whatever light comes through. Adjust one and you change how much light reaches your sensor, which usually means you need to adjust one of the others to keep the exposure balanced.
What Exposure Really Means
Exposure is simply the amount of light that reaches your camera’s sensor. Too little light and your image is dark and underexposed. Too much light and your image is washed out, losing detail in the brightest areas. Your camera’s built-in meter gives you a starting point, but it doesn’t know what actually matters in your frame. It might suggest a slow shutter speed for a dim scene, when what you really need is a faster setting to keep a moving subject sharp. That’s where understanding the triangle lets you take over.
Aperture: Light and Depth of Field
Aperture is the opening inside your lens, made of overlapping blades that widen or narrow to control how much light passes through. It’s measured in f-stops, and this is the part that trips up nearly everyone: a smaller f-number means a wider opening, and a larger f-number means a smaller one. So f/1.8 lets in a lot of light through a wide hole, while f/16 lets in very little through a tiny pinhole.
Beyond brightness, aperture is your main tool for controlling depth of field, the zone of the image that appears sharp.
- Wide apertures (f/1.4 to f/2.8) create a shallow depth of field, isolating your subject with a soft, blurred background. This is why portrait photographers love them.
- Middle apertures (f/4 to f/8) work well for everyday shots, groups, and travel photos where you want a reasonable amount in focus.
- Narrow apertures (f/8 to f/16) keep both foreground and background sharp, ideal for landscapes and architecture.
A quick example: photograph a friend at a park at f/2.0 and their face stays sharp while the trees behind them melt into a blur. Switch to f/11 for a wide shot of the same park and you’ll get detail from the grass at your feet to the clouds overhead. One caveat worth knowing: pushing aperture to the extreme narrow end can actually soften an image slightly due to diffraction, so f/8 to f/11 is often the sharpest practical range for landscapes, depending on your lens.
Shutter Speed: Freezing or Blurring Time
Shutter speed is how long the sensor stays exposed to light, measured in seconds or fractions of a second: 1/1000, 1/60, one second, and so on. A fast shutter speed lets in less light but freezes motion. A slow one lets in more light but records movement as blur.
- 1/1000 second or faster: freezes fast action like sports, running dogs, or birds in flight.
- 1/250 to 1/500 second: good for walking subjects, pets, and casual street photography.
- 1/60 to 1/125 second: fine for still subjects when you’re holding the camera steadily.
- 1/15 second or slower: produces intentional motion blur, useful for silky waterfalls, light trails, or night scenes.
A handy rule of thumb for handheld shooting: try not to let your shutter speed drop below roughly one over your lens’s focal length. With a 50mm lens, that means staying close to 1/50 second or faster unless you want visible camera shake. For anything slower, especially those dreamy long-exposure waterfall shots, mount your camera on a tripod. Even the tiniest hand tremor will blur the entire frame otherwise.
ISO: Sensor Sensitivity and Noise
ISO controls how sensitive your sensor is to light. Low values like ISO 100 mean less sensitivity and the cleanest image quality, while high values like ISO 3200 or 6400 make the sensor far more responsive in dim conditions, at a cost.
That cost is digital noise, a grainy, speckled texture that eats into fine detail and color accuracy, especially in shadows. Raising ISO is a bit like turning up the volume on a stereo: crank it too high with no signal, and you start hearing hiss.
- ISO 100–200: bright daylight, tripod landscapes, studio work.
- ISO 400–800: overcast days, shaded streets, indoor window light.
- ISO 1600–3200: events, dusk, evening scenes.
- ISO 6400 and above: very dim venues or fast action in low light, when getting the shot matters more than a perfectly clean file.
Modern cameras, especially recent mirrorless bodies, handle high ISO much better than older models did, so don’t be afraid to push it when the scene demands it. A sharp image at ISO 3200 beats a blurry one at ISO 400 every time. Noise can often be reduced in editing; motion blur from too slow a shutter speed usually can’t be fixed.
How the Three Settings Work Together
Each significant exposure change is called a stop, and moving by one stop roughly doubles or halves the light reaching the sensor. Changing shutter speed from 1/250 to 1/125 doubles your exposure time. Opening aperture from f/4 to f/2.8 lets in about twice as much light. Raising ISO from 400 to 800 doubles the sensor’s sensitivity.
Say your camera gives a correct exposure at ISO 100, f/8, and 1/125 second. You want a blurrier background for a portrait, so you open up to f/4. That brings in extra light, so to avoid overexposing, you speed up the shutter to roughly 1/500 second. The overall brightness stays similar, but the image changes creatively, and the faster shutter also helps protect against subject movement.
Real-World Scenarios
An Action Shot on a Cloudy Day
Your priority is shutter speed, at least 1/1000 second, to freeze a soccer player mid-kick. That eats a lot of light, and the overcast sky isn’t helping. Open your aperture as wide as your lens allows, and if the shot is still too dark, raise ISO to 800 or 1600.
A Sunset Landscape
Your priority is depth of field, so you set a narrow aperture like f/11. That lets in little light, and the sun is dropping fast. Keep ISO at 100 for the cleanest file, accept a slower shutter speed, and mount your camera on a tripod to avoid shake.
A Waterfall on a Trail
Aperture around f/11 keeps the scene sharp front to back. A shutter speed of one second or longer turns the water silky smooth. ISO stays at 100 since the tripod is doing the heavy lifting.
Getting Started: Priorities and Practice
Trying to control all three settings at once can feel like spinning plates. Instead, decide what matters most for the shot, then build around it. For portraits, start with aperture and pick your background blur first. For sports or wildlife, start with the shutter speed you need to freeze motion. For landscapes, start with the depth of field you want, then adjust the rest.
Semi-automatic modes make this easier to learn. Aperture Priority (A or Av) lets you set the aperture and ISO while the camera calculates shutter speed, which is great for practicing depth of field. Shutter Priority (S or Tv) lets you set shutter speed and ISO while the camera handles aperture, perfect for learning to freeze or blur motion.
For hands-on practice, pick one static subject, like a mug on a windowsill or a plant on a table. Take the same shot several times, changing only the aperture from f/1.8 to f/16 while adjusting shutter speed to keep brightness consistent. Then repeat the exercise, this time locking aperture and shutter speed and changing only ISO from 100 up to 6400, so you can see exactly how much noise creeps in as the numbers climb. Twenty minutes of this teaches more than any chart.
Common Mistakes to Avoid
- Using too slow a shutter speed: camera shake or subject movement can ruin an otherwise well-exposed photo. Check sharpness, not just brightness.
- Keeping ISO low at all costs: a low ISO doesn’t help if your shutter speed ends up too slow to produce a usable image.
- Opening the aperture without thinking about focus: at f/1.4, even slight movement can push an eye outside the sharp zone.
- Trusting the rear screen alone: a bright display can make an underexposed file look fine. Use the histogram or highlight warnings when your camera offers them.
- Ignoring blown-out highlights: skies and bright windows are often impossible to recover later, so keep an eye on the brightest parts of the frame as you shoot.
Once these three settings stop feeling like separate rules and start feeling like one connected system, you’ll shoot faster and with far more confidence, even in tricky light. The exposure triangle isn’t something you master in a weekend, but it clicks faster than most people expect once you stop reading about it and start shooting with intention. Pick one setting to experiment with today, and let the other two follow.
Exposure triangle is the relationship between aperture, shutter speed, and ISO, the three camera settings that together determine how bright or dark an image turns out, while each one also shapes depth of field, motion, or noise. Start with whichever setting matches your creative priority: aperture for background blur, shutter speed for freezing or blurring motion, and let ISO fill in the gap once the other two are set.