Understanding Depth of Field in Photography
Depth of field is one of the most useful creative controls in photography. It determines how much of a scene appears acceptably sharp, from a thin slice around a subject to a broad area extending from the foreground into the distance. Learning to control it helps you direct attention, create atmosphere, and avoid photographs that are unintentionally soft where they matter.
The key is understanding that depth of field is not controlled by aperture alone. Aperture, focal length, subject distance, and sensor format all influence the result. Once you know how these factors interact, you can make deliberate choices instead of simply turning the dial toward the smallest f-number.
What is depth of field?
Depth of field, often shortened to DOF, is the range of distance in a photograph that appears acceptably sharp. It is not a hard boundary. Sharpness gradually becomes less precise in front of and behind the point of focus, but the transition is usually subtle enough that we describe a zone as being “in focus.”
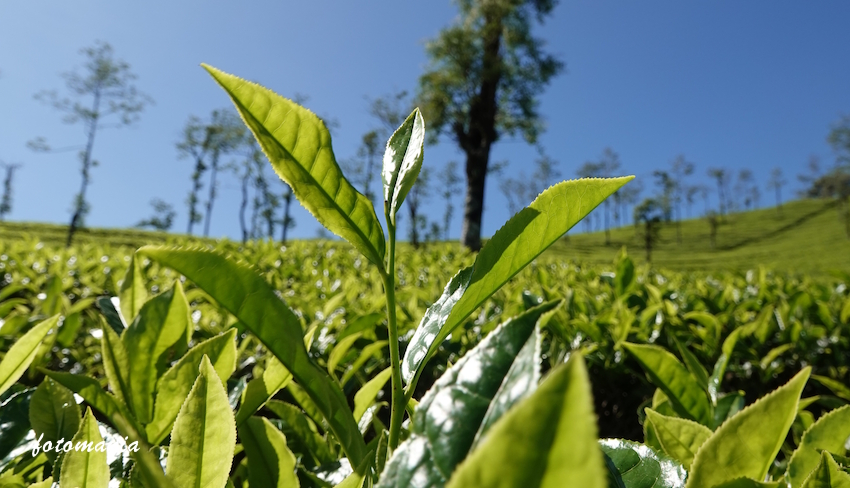
When depth of field is shallow, only a narrow area is sharp. This is useful for portraits, food photography, and detail shots because it can separate the subject from a distracting background. When depth of field is deep, much more of the scene appears sharp, which is often desirable in landscapes, architecture, interiors, and group portraits.
Do not confuse depth of field with depth of focus. Depth of field refers to the acceptable sharpness in front of and behind the subject in the scene. Depth of focus refers to the small range of positions behind the lens where the image can be recorded sharply, such as at a camera sensor or film plane.
The four factors that affect depth of field
Aperture
Aperture is the opening inside the lens that controls how much light reaches the camera sensor. It is expressed using f-numbers such as f/1.8, f/4, f/8, and f/16.
A wide aperture, represented by a smaller f-number such as f/1.8 or f/2.8, generally produces a shallower depth of field. A narrow aperture, such as f/11 or f/16, generally produces a deeper depth of field.
For example, a portrait made at 85mm and f/2 may show the eyes sharply while the ears and background become soft. Changing the aperture to f/8 increases the range of the face that can appear sharp and usually reveals more background detail.
There are practical limits. Very wide apertures can leave so little depth of field that focusing must be precise, particularly with close subjects. Very narrow apertures can also reduce fine detail through diffraction, an optical effect that gradually softens the image as the aperture becomes extremely small. The best aperture is therefore a creative and practical choice, not always the smallest or largest available.
Focal length
Focal length affects the angle of view and the appearance of depth of field. Longer focal lengths, such as 135mm, are commonly associated with a more blurred background than shorter focal lengths when the subject is framed similarly.
However, the explanation is more nuanced than “long lenses always have less depth of field.” If you photograph from the same position and change only the focal length, the longer lens magnifies the subject and changes the composition. If you move to maintain the same framing, your increased distance from the subject also affects depth of field and perspective.
The practical lesson is simple: a longer lens can make it easier to isolate a subject, especially when the background is well behind it, but focal length should be considered together with camera position, aperture, and composition.
Subject distance
The closer you focus, the shallower the depth of field becomes. This is why close-up and macro photography can be challenging: at short distances, even stopping down may leave only a small portion of the subject sharp.
Imagine photographing a flower at close range. At a wide aperture, the front edge of one petal may be sharp while the rest fades quickly out of focus. Moving the camera farther away increases the available depth of field, although it also changes the framing. You can then use a longer focal length or crop the image if you need a tighter composition.
Subject distance also provides a useful way to control background blur without changing aperture. Moving closer to a person while keeping the same framing usually requires changing focal length or camera position, but placing the person farther from the background can make that background appear more out of focus.
Sensor format
Sensor format influences depth of field for a given composition and aperture. Cameras with larger sensors can produce a shallower depth of field at the same framing and f-number, while smaller sensors often make it easier to keep more of a scene sharp.
This does not mean that one sensor format is better. A smaller camera can be helpful for travel, street photography, or situations where you want more depth in focus. A larger sensor may make subject isolation easier for portraits or low-light work. The lens, camera position, framing, and final image all matter more than sensor size considered on its own.
How to create a shallow depth of field
For a blurred background, start by choosing an appropriate aperture, but do not stop there. Use the combination of techniques that suits the scene:
- Choose a wide aperture, such as f/1.8, f/2, or f/2.8, if your lens allows it.
- Move closer to the subject, while checking that the composition and focus remain manageable.
- Use a longer focal length when it fits the subject and available space.
- Place the subject well away from the background.
- Focus carefully on the most important part of the subject, such as the nearer eye in a portrait.
Background distance is particularly important. A person standing two metres in front of a wall will usually have a more recognisably detailed background than a person standing well away from the wall, even when the camera settings are identical.
Look at the background before pressing the shutter. Small points of light, leaves, signs, and bright highlights can become prominent out-of-focus shapes. Blur can remove distractions, but it can also create them if the background has strong contrast or cluttered forms.
How to create a deep depth of field
For landscapes and scenes where foreground and background detail both matter, use a narrower aperture such as f/8, f/11, or another setting that suits the lens and available light. Then focus at a useful distance rather than automatically focusing on the far horizon.
A common approach is to focus roughly one-third of the way into the scene, but this is only a guideline. The best focus point depends on how close the foreground is, how far the background extends, the focal length, and the chosen aperture.
At very close distances, focusing near the middle of the visual range may leave the nearest foreground soft. If the scene is important and the camera is fixed on a tripod, focus stacking can be an option. This involves making several photographs focused at different distances and combining them in suitable software. It is most practical when the subject and camera remain still.
Depth of field in real shooting situations
Portraits
Aperture priority mode is often a useful starting point for portraits. Select the aperture you want, then watch the shutter speed chosen by the camera. At a wide aperture, focus on the eye that is closest to the camera, particularly when the face is turned at an angle.
For a single person, a shallow depth of field can provide separation. For two or more people, avoid assuming that the same setting will keep everyone sharp. Arrange faces on a similar plane or stop down to increase the zone of focus.
Landscapes
Landscape photographs often benefit from more depth of field, but f/16 is not automatically the correct answer. A narrower aperture may require a slower shutter speed or higher ISO, and diffraction may reduce fine detail. Start around the middle apertures available on your lens, inspect the foreground and background, and adjust according to the scene.
A tripod can help when a slower shutter speed is necessary, but it does not solve focusing errors. Decide which elements must be sharp before choosing the focus distance.
Street and documentary photography
When subjects move unpredictably, a moderately narrow aperture can make focusing more forgiving. Some photographers use manual focus and pre-focus at an estimated distance, a technique known as zone focusing. The usable zone depends on focal length, aperture, and focusing distance, so check your camera’s distance scale or use a depth-of-field app if you need precise results.
A simple depth-of-field exercise
You can see the effect clearly with three objects placed at different distances, such as a mug, a book, and a plant. Keep the camera in one position and photograph the arrangement at a wide aperture. Focus on the nearest object, then the middle object, and finally the farthest object.
Repeat the exercise at a narrower aperture. Compare how the sharp area changes and notice how the background blur is affected. Then move the camera closer and repeat the test. This separates the effects of aperture and distance more clearly than changing several settings at once.
Review the images at the size at which you normally share or print them. Depth of field is judged by acceptable sharpness, which depends partly on viewing distance and image size. A photograph that looks sharp on a phone may reveal softness when enlarged.
Choosing depth of field deliberately
Before adjusting the aperture, ask what the photograph needs. Should the viewer concentrate on one face, object, or gesture? A shallow depth of field may help. Do the relationships between several parts of the scene matter? More depth of field may be appropriate.
There is no universally correct amount of blur. A technically sharp background can provide useful context, while an extremely blurred background can make an image feel disconnected from its setting. Use depth of field to support the subject and the story, not as a visual effect applied automatically.
With practice, you will begin to estimate the result before taking the photograph. Check the aperture, consider your distance from the subject, look at the background, and focus on the most important detail. Those small decisions turn depth of field from a camera setting into a reliable part of your photographic language.