Beginners Guide To Mastering Photoshop
Photoshop can feel overwhelming at first glance. The interface is dense, the toolbox is extensive, and it is not always obvious where to begin—especially if you are used to editing photos in Lightroom or on a phone. The good news is that you do not need to learn every feature to produce useful, polished results. A small group of tools and concepts will cover most everyday photography edits.
This guide focuses on editing photographs rather than graphic design or digital painting. You will learn how to navigate the workspace, work non-destructively, make targeted adjustments, retouch distractions, sharpen images and export finished files correctly.
Understanding the Photoshop Workspace
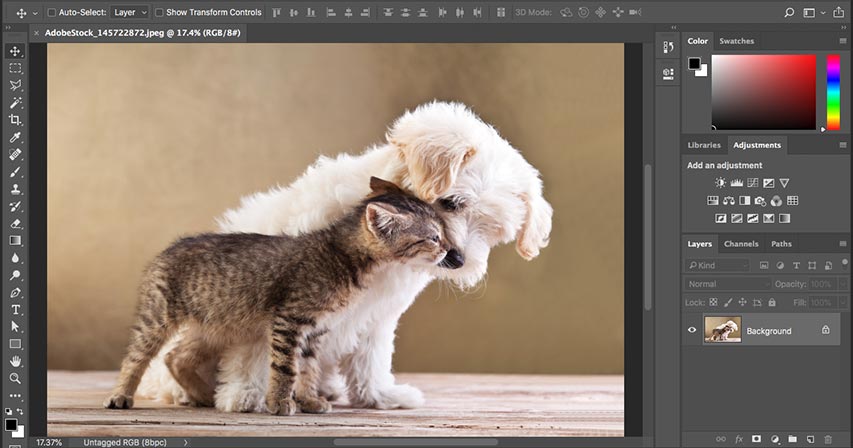
Before making an edit, spend a few minutes becoming familiar with the layout. Photoshop’s workspace can be customised, and the panels you see may vary depending on the version and workspace selected. If useful, choose Window > Workspace > Photography to display panels commonly used for image editing.
- Toolbar: Usually positioned on the left, it contains tools for cropping, selecting, retouching, painting and moving image elements.
- Options bar: Located beneath the menus, this changes according to the active tool. If a tool behaves unexpectedly, check its settings here first.
- Layers panel: Displays the image’s layers, masks and blending options. It is the centre of a flexible Photoshop workflow.
- Properties panel: Shows controls for selected adjustment layers, masks and some other editable elements.
- Document window: This is where you view and edit the image. Use the zoom controls or press Ctrl/Cmd + 0 to fit the image to the available window.
Save your file early and save regularly. A Photoshop document can contain many layers, and losing that structure because of a crash or accidental closure is difficult to recover from.
Start With a Sensible Editing Workflow
A reliable order of operations makes Photoshop easier to manage. Begin by opening your photograph and checking its overall composition. Use the Crop tool to improve the framing or straighten a tilted horizon. If the image is a raw file, Photoshop will normally open it in Adobe Camera Raw first. This is a useful place to adjust white balance, exposure, highlights, shadows and lens corrections before continuing in Photoshop.
Do not treat this order as a rigid rule. Some images need retouching before tonal adjustments, and you may return to an earlier step later. The main principle is to make broad changes before detailed ones:
- Crop and straighten the composition.
- Correct exposure, contrast and white balance.
- Adjust colour and local brightness.
- Retouch unwanted distractions.
- Apply creative effects or convert to black and white.
- Sharpen and export an appropriate version for its final use.
Why Layers Matter
Layers are one of Photoshop’s most important concepts. Think of them as transparent sheets stacked over the original photograph. You can place a colour correction on one layer, remove a distraction on another and add a local brightness adjustment on a third without permanently changing the original pixels.
This is known as non-destructive editing. It makes it easier to revise your work, compare different versions and correct mistakes. By contrast, editing directly on the Background layer permanently changes those pixels unless you undo the operation.
Whenever possible, use adjustment layers instead of applying corrections directly through the Image menu. Click the adjustment icon at the bottom of the Layers panel and choose an option such as Curves, Levels or Hue/Saturation. The adjustment appears on its own layer, where you can change its settings, hide it or delete it later.
Use clear layer names such as “Brighten face” or “Remove sign”. A few descriptive names make a major difference once a document contains several edits. You can also group related layers into folders using the folder icon at the bottom of the Layers panel.
The Adjustment Layers You’ll Use Most
Photoshop includes many adjustment types, but photographers tend to return to the same core tools.
- Curves: Provides precise control over brightness and contrast. A gentle S-shaped curve can increase contrast, while lifting or lowering specific parts of the curve lets you target shadows, midtones or highlights. Curves can also be switched to individual colour channels for colour correction.
- Levels: Offers a more straightforward way to set black, white and midtone values. It is useful when an image looks flat or its tonal range does not fill the available range.
- Brightness/Contrast: A simple option for broad corrections. It is easy to use, although Curves usually offers more control when you need a subtle result.
- Hue/Saturation: Lets you alter colour, saturation and lightness globally or within selected colour ranges. Use it carefully, since increasing saturation too far can produce unnatural colour and clipped detail.
- Color Balance: Allows separate colour adjustments in the shadows, midtones and highlights. It can help create a warmer or cooler appearance, although white balance is usually better corrected in Camera Raw or with a dedicated colour-temperature control.
- Black & White: Converts an image to monochrome while allowing you to control how the original colours appear as shades of grey. This is useful for controlling the brightness of skies, foliage and skin tones in a black-and-white conversion.
Keep the effect restrained and check the image at both fit-to-screen and 100% magnification. An adjustment that looks subtle when zoomed in may be much too strong at normal viewing size.
Selections and Layer Masks
A selection tells Photoshop which part of an image should be affected. Without one, an adjustment generally applies to the whole layer. With a selection or mask, you can brighten a face, darken a sky, change the colour of a jacket or sharpen only the important details.
Useful selection tools include:
- Select Subject: Automatically attempts to identify the main subject of an image. It can provide a useful starting point, but inspect the edges and refine them where necessary.
- Quick Selection tool: Lets you paint over an area while Photoshop attempts to follow nearby edges.
- Object Selection tool: Can help select a visible object or a defined region, depending on the image.
- Lasso tools: Useful for quick, irregular selections when an exact edge is not important.
- Select and Mask: Provides controls for refining edges, including selections around hair, fur or other fine details.
After making a selection, click the Add Layer Mask button at the bottom of the Layers panel. Photoshop uses the selection to determine where the layer is visible. On a mask, white reveals the layer and black conceals it. Painting with a soft brush at a low opacity creates gradual transitions rather than obvious edges.
If a mask is not behaving as expected, click its thumbnail in the Layers panel before painting. The white outline around the thumbnail shows whether you are editing the image or the mask.
Retouching With Healing and Cloning Tools
Photoshop offers several ways to remove distractions, but three tools cover many common tasks.
The Spot Healing Brush is the quickest option for small blemishes, dust spots and minor objects. It samples nearby pixels automatically and blends them into the painted area. It works best when the surrounding texture is reasonably consistent.
The Healing Brush gives you more control because you choose the source area before painting. It blends the sampled texture with the brightness and colour of the destination, making it useful for skin and other areas where simple copying would look obvious.
The Clone Stamp copies pixels directly from one part of an image to another. Hold Alt/Option and click to choose a source point, then paint over the area you want to replace. It is particularly useful around hard edges, repeating patterns and detailed backgrounds, where automatic healing may create smears.
For larger distractions, the Patch tool can work well. Draw around the unwanted area and drag the selection to a cleaner region. Always inspect the result for repeated patterns, distorted edges and inconsistent lighting.
For flexible retouching, create a new blank layer and set the relevant tool to sample the current layer and the layers below it, where available. Alternatively, duplicate the layer before making substantial changes. This keeps the original pixels available and lets you reduce the retouching layer’s opacity if the result looks too strong.
Sharpening Without Overdoing It
Sharpening increases the apparent definition of edges; it does not restore detail that was never captured. It can also emphasise noise, halos and compression artefacts, so use it with restraint.
Unsharp Mask and Smart Sharpen are two useful Photoshop options. Smart Sharpen offers controls that can help manage blur and reduce the appearance of unwanted halos, while Unsharp Mask is a straightforward way to increase edge contrast.
Sharpening should usually be adjusted at 100% magnification. For a portrait, apply it selectively to features such as the eyes, eyebrows and hair rather than smooth skin. A landscape or architectural image may tolerate more global sharpening, but check high-contrast edges for bright or dark outlines.
Raw processing software, including Camera Raw, can apply capture sharpening before the file reaches Photoshop. You may still need a separate, restrained output-sharpening step after resizing for print or online use. The correct amount depends on the image, its final size and the viewing medium.
Saving and Exporting Your Work
Save the editable working document as a PSD or TIFF if you need to preserve layers, masks and adjustment settings. A JPEG is convenient for sharing, but repeatedly saving over a JPEG can reduce quality and it does not retain Photoshop’s layered structure.
For a web image or general sharing, use Photoshop’s export controls to create a copy in the required format. JPEG is suitable for most photographs, while PNG is useful when you need transparency or are exporting certain types of graphic content. Convert or assign the appropriate colour profile as part of the export process; sRGB is commonly used for images intended for browsers and general online viewing.
For printing, follow the printer or lab’s specifications rather than relying on a universal setting. They may request a particular file format, colour profile, pixel dimensions or sharpening approach. Keep your layered master file separate from the final export so you can produce another version later without starting again.
A Practical Way to Learn Photoshop
Do not try to memorise the entire toolbar. Choose one photograph and practise a complete workflow: crop it, add a Curves adjustment layer, mask that adjustment onto the subject, remove one distraction and export a copy. Then toggle the layers on and off to understand exactly what each edit contributes.
Focus first on layers, masks, Curves, selections and the healing tools. Once those become familiar, more advanced features such as blend modes, Smart Objects and frequency-specific retouching will be easier to understand. Photoshop becomes far less intimidating when you treat it as a collection of controlled, reversible steps rather than one enormous toolset.